本教程簡單介紹人物照片的一些美化方法。從原圖素材可以看出需要處理的地方比較多如背景,人物美化及整體調色等。可以把適當把背景及人物分開來處理。
原圖

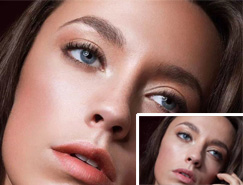
最終效果

1、打開原圖素材,按Ctrl + J把背景圖層復制一層,圖層混合模式改為“濾色”,圖層不透明度改為:50%,效果如下圖。

<圖1>
2、新建一個圖層,按Ctrl + Alt + Shift + E蓋印圖層,執行:濾鏡 > 模糊 > 高斯模糊,數值為3,確定后按住Alt鍵再點圖層蒙版按鈕加上圖層蒙版,然后用白色畫筆在人物臉上及皮膚上有雜色部分涂抹給人物磨皮。

<圖2>
3、合并所有圖層,新建一個圖層,選擇漸變工具顏色設置如圖3,然后由上至下拉出圖4所示漸變效果。

<圖3>

<圖4>
4、打開下圖所示的花紋素材,拖進來放好位置,然后按Ctrl + Alt + ~調出高光選區,按Ctrl + Shift + I反選,然后點蒙版按鈕加上圖層蒙版效果如圖6。

<圖5>

<圖6>
5、新建一個圖層,蓋印圖層,執行:濾鏡 > 模糊 > 高斯模糊,數值為5,確定后把圖層不透明度改為:40%,效果如下圖。

<圖7>
6、新建一個圖層,圖層混合模式改為“顏色減淡”,選擇橢圓選框工具拉出圖8所示的選區,按Ctrl + Alt + D羽化數值為50,然后填充顏色:#FAF19E,取消選區后效果如圖9。

<圖8>

<圖9>
7、把剛才操作的圖層復制一層,移到圖片的 左上角,效果如圖10。

<圖10>
8、把背景圖層復制一層,按Ctrl + Shift + ]移到圖層的最上面,用鋼筆工具把人物部分摳出來,復制到新的圖層,再把背景副本隱藏,效果如圖11。

<圖11>
相關文章:
推薦設計

優秀海報設計精選集(8)海報設計2022-09-23

充滿自然光線!32平米精致裝修設計2022-08-14

親愛的圖書館 | VERSE雜誌版版式設計2022-07-11

生活,就該這麼愛!2022天海報設計2022-06-02


最新文章

5個保姆級PS摳圖教程,解photoshop教程2023-02-24

合同和試卷模糊,PS如何讓photoshop教程2023-02-14

PS極坐標的妙用photoshop教程2022-06-21

PS給數碼照片提取線稿photoshop教程2022-02-13


