20、創建色階調整圖層,把中間調的顏色大幅壓暗,參數及效果如下圖。


21、創建反相調整圖層,效果如下圖。

22、創建色階調整圖層,把高光大幅調亮,參數及效果如下圖。


23、新建一個圖層,按Ctrl + Alt + Shift + E 蓋印圖層,然後命名為“蓋印”,如下圖。

24、新建一個圖層,把前景色設置為淡青色#9cedda,然後用油漆桶工具填充前景色,如下圖。


25、選擇背景圖層。

26、按Ctrl + J 把背景圖層複製一層,按Ctrl + Shift + ] 置頂,然後點擊蒙版按鈕,添加圖層蒙版,如下圖。

27、選擇“蓋印”圖層,按Ctrl + A 全選,按Ctrl + C 複製。

28、選擇“背景副本”圖層,按住Alt鍵 + 鼠標左鍵點擊一下蒙版縮略圖,如下圖。

29、按Ctrl + V 把複製的圖層粘貼進來,如下圖。

30、按住Alt鍵 + 鼠標左鍵點擊一下蒙版縮略圖回到圖像狀態,按Ctrl + D 取消選區,效果如下圖。

31、選擇背景圖層,按Ctrl + J 複製一層,按Ctrl + Shift + ] 置頂,如下圖。

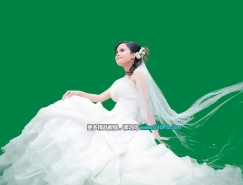
32、選擇鋼筆工具,勾出人物主體部分的輪廓,如下圖。

33、按Ctrl + 回車 把路徑轉為選區,然後點擊蒙版按鈕,添加圖層蒙版,如下圖。

34、前景色設置為白色,選擇畫筆工具,在預設裏面選擇14號畫筆,然後把不透明度設置為10%,如下圖。

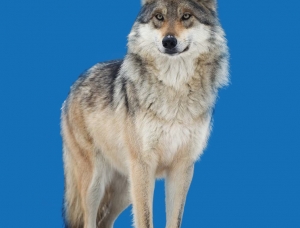
35、用畫筆把紅框位置不自然的毛發塗抹出細節。

最終效果


推薦設計

優秀海報設計精選集(8)海報設計2022-09-23

充滿自然光線!32平米精致裝修設計2022-08-14

親愛的圖書館 | VERSE雜誌版版式設計2022-07-11

生活,就該這麼愛!2022天海報設計2022-06-02


最新文章

5個保姆級PS摳圖教程,解photoshop教程2023-02-24

合同和試卷模糊,PS如何讓photoshop教程2023-02-14

PS極坐標的妙用photoshop教程2022-06-21

PS給數碼照片提取線稿photoshop教程2022-02-13


