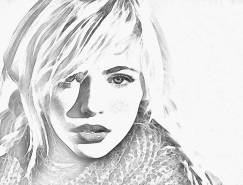
作者製作質感人像的方法非常實用,先降低膚色的亮度;然後增加膚色及及五官部分高光亮度和對比度;再給整體去色後再加上金屬色;最後增加對比,增強局部質感,得到想要的效果。
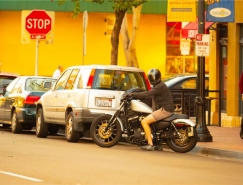
原圖

最終效果

1、複製原圖,新建可選顏色調解層,設置參數如下。


2、新建亮度/對比度調解層,調節亮度和對比度,然後降低柔角畫筆不透明度到12%,在人物的五官和輪廓上進行塗抹。

3、新建通道混合器調節層,預設改為紅外線的黑白,並調整參數,具體如下。

4、新建純色調解層,拾取顏色#564931,確定後將圖層模式改為顏色。

5、新建曲線調解層,調節曲線,具體如下。

6、建立純色調解層,拾取顏色#544623,確定後黑色填充蒙板,在蒙板上用不透明度為12%柔角畫筆擦出人物的輪廓和五官。

7、新建圖層命名為唇,選擇畫筆,用#544623顏色,在唇部進行塗抹後將圖層模式改為顏色減淡。


打上文字,將圖層模式改為顏色減淡,完成。
推薦設計

優秀海報設計精選集(8)海報設計2022-09-23

充滿自然光線!32平米精致裝修設計2022-08-14

親愛的圖書館 | VERSE雜誌版版式設計2022-07-11

生活,就該這麼愛!2022天海報設計2022-06-02


最新文章

5個保姆級PS摳圖教程,解photoshop教程2023-02-24

合同和試卷模糊,PS如何讓photoshop教程2023-02-14

PS極坐標的妙用photoshop教程2022-06-21

PS給數碼照片提取線稿photoshop教程2022-02-13


