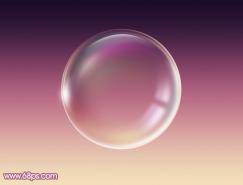
氣泡製作重點是高光部分的處理:從邊緣到中間的高光都不是相同的;邊緣的高光比較均勻;中間的高光就變化多一點,有類似星光的高光,也有弧形高光。
最終效果

1、新建一個600 * 600像素的文檔,背景填充暗藍色:#072A89,新建一個圖層,用橢圓選框工具拉出下圖所示的正圓選區,填充跟背景相同的顏色,如下圖。

2、新建一個圖層,按Ctrl + Alt + G 與前一圖層編組。然後在當前圖層下面新建一個圖層,用鋼筆勾出下圖所示的選區,羽化8個像素後填充白色。取消選區後添加圖層蒙版,用黑色畫筆把兩端的過渡稍微塗抹一下,大致效果如下圖。

3、調出正圓選區,新建一個圖層,選擇菜單:編輯 > 描邊,寬度4,取消選區後效果如下圖。


4、執行:濾鏡 > 模糊 > 高斯模糊,數值為4,確定後把圖層不透明度改為:45%,效果如圖。


5、新建一個圖層,用鋼筆勾出下圖所示的選區,按Shift + F6羽化3個像素後填充白色。取消選區後用塗抹工具把邊緣塗抹一下,局部用模糊工具稍微模糊處理。然後添加圖層蒙版,用黑色畫筆把邊緣過渡擦出來,效果如圖。


6、新建一個圖層,用鋼筆勾出左邊高光部分的選區,羽化2個像素後填充白色。取消選區後添加圖層蒙版,用黑色畫筆把右邊過渡擦出來,如下圖。

7、新建一個圖層,用鋼筆勾出下圖所示的選區,羽化15個像素後填充白色。取消選區後添加圖層蒙版,用黑色畫筆把左邊空隙部分擦出來,如下圖。

8、新建一個圖層,用鋼筆勾出下圖所示的選區,羽化3個像素後填充白色。取消選區後用塗抹工具把邊緣塗抹一下,效果如圖。


9、新建一個圖層,用鋼筆勾出下圖所示的路徑。轉為選區後填充白色。取消選區後用模糊工具稍微模糊一下,添加圖層蒙版,用黑色畫筆把兩端過渡擦出來,效果如圖。


10、新建一個圖層,同上的方法再製作其它的小光束,過程如圖。


11、新建一個圖層,用鋼筆勾出下圖所示的選區,羽化3個像素後填充白色,不透明度改為:40%,效果如下圖。

12、新建一個圖層,用鋼筆勾出下圖所示的選區,羽化5個像素後填充白色。取消選區後添加圖層蒙版,用黑色畫筆把邊緣部分的過渡擦出來,再把圖層不透明度改為:20%,如圖。


13、同上的方法製作右邊高光,過程如圖。


14、新建一個圖層,同上的方法製作頂部的小高光,效果如下圖。

15、新建一個圖層,同上的方法製作左邊較淡的高光,過程如圖。


16、新建一個圖層,再給頂部加上一塊小高光,如下圖。

17、感覺底部細節還不夠。新建一個圖層,用鋼筆再加上一些小線條,效果如下圖。

最後微調一下細節,完成最終效果。
标签:氣泡

推薦設計

優秀海報設計精選集(8)海報設計2022-09-23

充滿自然光線!32平米精致裝修設計2022-08-14

親愛的圖書館 | VERSE雜誌版版式設計2022-07-11

生活,就該這麼愛!2022天海報設計2022-06-02


最新文章

5個保姆級PS摳圖教程,解photoshop教程2023-02-24

合同和試卷模糊,PS如何讓photoshop教程2023-02-14

PS極坐標的妙用photoshop教程2022-06-21

PS給數碼照片提取線稿photoshop教程2022-02-13


