效果字都是用圖層樣式來完成。過程:先簡單做好紋理背景;然後輸入想要的文字,並複製一層;再給頂部的文字增加顏色、紋理、質感等;底部的文字用來增加立體效果即可。
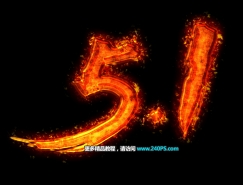
最終效果

1、現在新建一個600*500px的圖層。

2、然後複製背景圖層一次,並且重新命名為Background Pattern。

3、在這個圖層裏我們要添加圖案(先保存下圖所示的紋理素材,用PS打開,選擇菜單:編輯 > 定義圖案),打開圖層樣式然後選擇圖案疊加,選擇如圖所示的圖案。


之後我們選擇顏色疊加,正片疊底,顏色為#000000,透明度100%。


現在我們給背景圖添加紅色的高光,打開圖層樣式 ,然後在斜面浮凋裏選擇樣式為內斜面,平滑,深度160%,方向:上,大小250px,柔軟:16px,角度90°,高度40°,顏色減澹#df0909,透明度95%,差值#4b5a64,透明度30% 。


4、打上文字“SAINT”,大小為130pt,字間距為20pt,字體設置為尖銳。現在我們來複製一層文本並重命名為‘SAINT b’,然後隱藏該圖層~喲喲喲~隱藏它是為了做下面的特效哦。

5、現在我們使用移動工具,選擇兩個文本和背景圖層然後垂直居中對齊。

6、選擇第一個文字圖層,然後打開圖層樣式,選擇圖案疊加,選擇我們設置好的圖案,將範圍設置為50%。
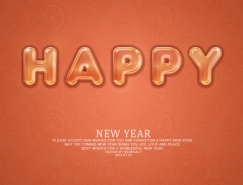


标签:紋理字


推薦設計

優秀海報設計精選集(8)海報設計2022-09-23

充滿自然光線!32平米精致裝修設計2022-08-14

親愛的圖書館 | VERSE雜誌版版式設計2022-07-11

生活,就該這麼愛!2022天海報設計2022-06-02


最新文章

5個保姆級PS摳圖教程,解photoshop教程2023-02-24

合同和試卷模糊,PS如何讓photoshop教程2023-02-14

PS極坐標的妙用photoshop教程2022-06-21

PS給數碼照片提取線稿photoshop教程2022-02-13


