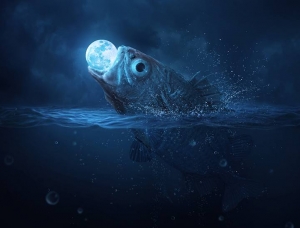
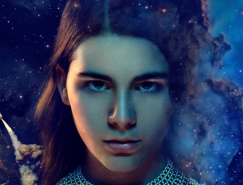
效果圖有點類似魚眼鏡頭效果,視野非常廣。這類圖片合成的時候多了一步變形處理,做出類似魚眼鏡效果,其它部分的處理跟平常的合成一樣。
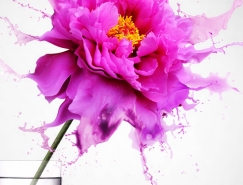
最終效果


1、新建圖層。

2、打開天空素材1,CTRL+T旋轉和變形彎曲天空效果如圖。

<點小圖查看大圖>

3、新建一個色彩平衡剪貼蒙版設置。


4、新建一個照片濾鏡剪貼蒙版,顏色ec8a00。

5、在這一層要用黑色畫筆來擦拭蒙版降低顏色對比。

6、新建一個可選顏色。


7、打開天空2,CTRL+T變形設置。

<點小圖查看大圖>

8、圖層模式改為 強光不透明度100%。

9、新建曲線圖層剪貼蒙版。


10、新建色相/飽和度剪貼蒙版。


11、打開玫瑰圖層使用M工具選擇玫瑰部分。

<點小圖查看大圖>

12、變換,彎曲圖片和天空貼合。

13、建一個蒙版使用黑色畫筆畫出邊緣和玫瑰貼合。

14、新建曲線圖層。

15、用黑色畫筆畫出霞光部分。

16、新建圖層。使用顏色# f8e1b9筆刷圖中部分。改變圖層模式為柔光100%。


17、在新建一個圖層,使用相同的筆刷,不透明度降低到30-40%畫出夢幻般的效果。

18、新建一個圖層,用一個柔軟的白色畫筆畫出陽光。

19、新建圖層,用軟刷和顏色# 291b01為現場添加更多的太陽光漆。改變線性減淡100%模式。


20、創建顏色填充圖層。

21、改變圖層模式排除100%。在這個圖層蒙版用黑色軟刷不透明約15-20%擦除上方的天空,減少品紅那裏。

22、創建另一個色彩填充層。

23、改變這一層的模式差值20%,使用黑色柔角筆刷擦除左上和圖片的中心,我不希望他們被這一調整層影響。


最終效果


1、新建圖層。

2、打開天空素材1,CTRL+T旋轉和變形彎曲天空效果如圖。

<點小圖查看大圖>

3、新建一個色彩平衡剪貼蒙版設置。


4、新建一個照片濾鏡剪貼蒙版,顏色ec8a00。

5、在這一層要用黑色畫筆來擦拭蒙版降低顏色對比。

6、新建一個可選顏色。


7、打開天空2,CTRL+T變形設置。

<點小圖查看大圖>

8、圖層模式改為 強光不透明度100%。

9、新建曲線圖層剪貼蒙版。


10、新建色相/飽和度剪貼蒙版。


11、打開玫瑰圖層使用M工具選擇玫瑰部分。

<點小圖查看大圖>
12、變換,彎曲圖片和天空貼合。

13、建一個蒙版使用黑色畫筆畫出邊緣和玫瑰貼合。

14、新建曲線圖層。

15、用黑色畫筆畫出霞光部分。

16、新建圖層。使用顏色# f8e1b9筆刷圖中部分。改變圖層模式為柔光100%。


17、在新建一個圖層,使用相同的筆刷,不透明度降低到30-40%畫出夢幻般的效果。

18、新建一個圖層,用一個柔軟的白色畫筆畫出陽光。

19、新建圖層,用軟刷和顏色# 291b01為現場添加更多的太陽光漆。改變線性減淡100%模式。


20、創建顏色填充圖層。

21、改變圖層模式排除100%。在這個圖層蒙版用黑色軟刷不透明約15-20%擦除上方的天空,減少品紅那裏。

22、創建另一個色彩填充層。

23、改變這一層的模式差值20%,使用黑色柔角筆刷擦除左上和圖片的中心,我不希望他們被這一調整層影響。


标签:PS合成


推薦設計

優秀海報設計精選集(8)海報設計2022-09-23

充滿自然光線!32平米精致裝修設計2022-08-14

親愛的圖書館 | VERSE雜誌版版式設計2022-07-11

生活,就該這麼愛!2022天海報設計2022-06-02


最新文章

5個保姆級PS摳圖教程,解photoshop教程2023-02-24

合同和試卷模糊,PS如何讓photoshop教程2023-02-14

PS極坐標的妙用photoshop教程2022-06-21

PS給數碼照片提取線稿photoshop教程2022-02-13


