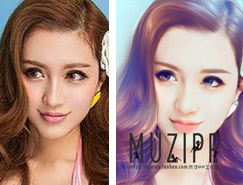
22、接著我們發現眼珠有點銳利,不夠融合,選擇眼珠圖層,用塗抹工具塗抹邊緣,效果如圖所示,再次發現眼睛少了陰影,新建一個圖層,命名陰影,如圖勾出兩條路徑,畫筆大小15左右,再高斯模糊一下效果如圖所示,眼睛部分到此結束,【ctrl+G】把眼睛的所有圖層合成【組】。


23、鼻子部分:
鼻子部分非常簡單,我們先勾鼻線,新建圖層,吸取皮膚比較深的顏色,勾出如圖所示路徑,描邊,畫筆數值2左右,降低透明度。


24、接下來我們做高光,勾出如圖所示路徑,用純白色描邊,高斯模糊一下,數值2左右,接著我們用畫筆在鼻尖處點一個小點,為的是有一種水潤的感覺,鼻子部分結束。


25、嘴巴部分:
嘴巴部分也是很簡單的,首先用套索工具把嘴的大概輪廓選出來,之後右鍵羽化10個像素。


26、之後新建一個圖層,選擇塗抹工具,數值如圖所示,勾選對所有圖層采樣,選擇50號不規則筆刷,從左往右塗抹。這一步是為了把唇紋塗平,創建色彩平衡調整圖層調一下唇色。


27、唇線也不難,沿著唇線勾出如圖路徑,選取嘴唇一個比較深的顏色,畫筆設置如圖所示,之後高斯模糊一下,效果如圖所示。唇線的目的是為了讓嘴唇更立體。


28、接下來給嘴唇加高光,勾路徑,用純白色描邊,畫筆設置如圖,高斯模糊一下,1像素左右,上唇高光方法同上。


29、接下來是嘴角,用比較深的皮膚顏色點兩個小圓,用塗抹工具塗抹向反方向塗抹如圖所示,在下面勾兩條小路徑做嘴角高光,2像素左右,好了五官的處理到此結束。


标签:手繪效果
推薦設計

優秀海報設計精選集(8)海報設計2022-09-23

充滿自然光線!32平米精致裝修設計2022-08-14

親愛的圖書館 | VERSE雜誌版版式設計2022-07-11

生活,就該這麼愛!2022天海報設計2022-06-02


最新文章

5個保姆級PS摳圖教程,解photoshop教程2023-02-24

合同和試卷模糊,PS如何讓photoshop教程2023-02-14

PS極坐標的妙用photoshop教程2022-06-21

PS給數碼照片提取線稿photoshop教程2022-02-13


