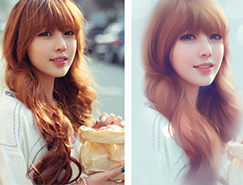
30、頭發部分:
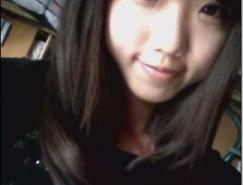
話說頭發我也是硬傷,頭發的方法是有很多的,這裏為了省時間就介紹比較簡單的一種,選擇套索工具選擇大概的頭發輪廓,看不清楚的可以把【背景副本圖層】關閉先。
如圖所示,右鍵羽化12個像素,選擇【背景圖層】按鍵盤上的【ctrl+j】複製,把它拖到最上面,高斯模糊直到頭發紋理不清晰為止,背景副本圖層顯示回來。


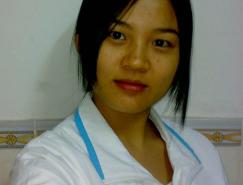
【描邊路徑】【選擇塗抹】【模擬壓力】可以描邊兩次,第二次可以適當降低塗抹強度,效果如圖。


進行調節,之後按鍵盤的【ctrl+shift+alt+e】蓋印圖層做最後的調整,陰影如圖用加深工具進行塗抹,再調整一下顏色就大功告成了。


話說頭發我也是硬傷,頭發的方法是有很多的,這裏為了省時間就介紹比較簡單的一種,選擇套索工具選擇大概的頭發輪廓,看不清楚的可以把【背景副本圖層】關閉先。
如圖所示,右鍵羽化12個像素,選擇【背景圖層】按鍵盤上的【ctrl+j】複製,把它拖到最上面,高斯模糊直到頭發紋理不清晰為止,背景副本圖層顯示回來。


31、之後就是勾頭發路徑,看不見頭發紋理的可以先把圖層7和背景副本圖層關閉,勾好之後再顯示,之後選擇塗抹工具,選擇100號筆刷,像頭發那樣的,設置如圖。
【描邊路徑】【選擇塗抹】【模擬壓力】可以描邊兩次,第二次可以適當降低塗抹強度,效果如圖。


32、接著選擇加深工具,選擇50號筆刷,設置如圖,【描邊路徑】【選擇加深】【模擬壓力】,有發絲的感覺了,哈哈,頭發到此就結束了。


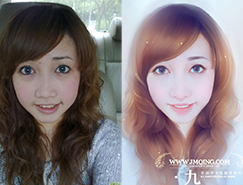
33、最後我們來做一下細微的調整,比如我不喜歡這個眼睛的顏色,那就可以選擇之前創建的色相飽和度圖層
進行調節,之後按鍵盤的【ctrl+shift+alt+e】蓋印圖層做最後的調整,陰影如圖用加深工具進行塗抹,再調整一下顏色就大功告成了。


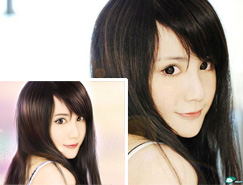
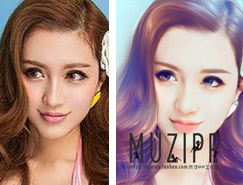
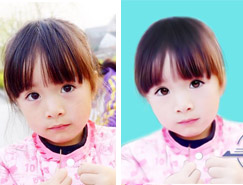
最終效果:

标签:手繪效果
推薦設計

優秀海報設計精選集(8)海報設計2022-09-23

充滿自然光線!32平米精致裝修設計2022-08-14

親愛的圖書館 | VERSE雜誌版版式設計2022-07-11

生活,就該這麼愛!2022天海報設計2022-06-02


最新文章

5個保姆級PS摳圖教程,解photoshop教程2023-02-24

合同和試卷模糊,PS如何讓photoshop教程2023-02-14

PS極坐標的妙用photoshop教程2022-06-21

PS給數碼照片提取線稿photoshop教程2022-02-13


